Sea Blue Lens


26 Comments

Third Thursday Challenge: Shooting the Moon

For several months I’ve intended to try photographing the full moon for the Third Thursday Challenge. Clouds, travel, and various other circumstances have conspired to prevent it until — hurray! — this month.

I have tried to take photos of the moon many times before, of course. The results were always disappointing. So I did some research online for information. I read several articles, but one I found very helpful was this one. I went out on three evenings leading up to the full moon, using my Nikon d5100 and 55-200mm zoom lens, experimenting with various camera settings. I even used a tripod!

3 moons-2If at first you don’t succeed….

I felt I’d achieved my initial goal with the final image above, which I was very pleased with. But then I decided to take it a bit further. What I really wanted to do was to capture the moon as part of a landscape. But there are some difficulties with that.

MoontreeX3-2Now what?

If I focused on the moon, the foreground was blurred. Focusing on the foreground meant the moon was fuzzy. And if I wanted to include a larger foreground subject, the moon was tiny in comparison. I already knew that those gorgeous shots of a huge moon rising over a crystal clear landscape were composites — two images combined — so I thought I’d play with that idea a bit.

I can’t tell you exactly what I did for each image, because each one was different and I didn’t record my steps. I just played around with different things — sometimes copying and pasting the moon into the image, sometimes layering two images the same way you would add a texture to a photo. Here are the results of my creative experiment:

birdmoonThe Birds

adobe moonAdobe Moon

moontreeMoon Tree

mooncradleEmbrace

I haven’t perfected the technique by any means, but I really enjoyed trying to achieve an effect I’ve always admired.

Thanks to Brenda at How to Feather an Empty Nest for hosting the Third Thursday Challenge each month. It has inspired me to actually try things I’ve only thought about for years, and through the monthly linkup I always discover even more new things to try. Maybe you’d like to join in!


25 Comments

Third Thursday and SHS 5.19.13

It’s a twofer! I decided to combine the Third Thursday Challenge , a monthly linkup at How to Feather an Empty Nest, with this week’s Scavenger Hunt Sunday. I recently bought a new lens, a Nikon 35mm f1.8, but up til now have not used it very much. I’ve been wanting to get better acquainted with it, so for my Third Thursday Challenge, I decided to take on the scavenger hunt using only that lens. My goal was to create images that would work with no (or minimal) cropping or other post-processing.

I couldn’t miss this week’s Scavenger Hunt, since the list was sponsored by my dear friend Susan (Happy No Ears). The target items for the hunt were Three, Hand(s), Fence, Cuddly, and Sign.

Three:

Berry BowlPerfection

First they posed for me. Then I ate them. They were just as good as they look.

Hand(s):

AaronAaron

My daughter made this doll for me with her own hands a number of years ago. Using no model except her imagination, she sculpted his head, hands, and feet from porcelain clay, which she then fired in her own kiln. She sewed the body from scraps of fabric and dressed him in a preemie-sized outfit, and gave him to me for Christmas. His realism amazed me then and still does, all the more because she has no children and, really, no experience with babies. I call him my third grandchild.

Fence:

Old FenceOld Fence

New FenceNew Fence

I couldn’t decide, so you get both.

Cuddly:

Pink ThrowThat Warm, Fuzzy Feeling

I have no babies or pets, and I’m mad at the oh-so-cute cottontails this week for eating my portulaca, so I’m not going to feature them! I love cuddling up on the couch with my soft, cozy mohair throw, so that will have to do.

Sign:

WelcomeCome On By

Friends are always welcome. Stop on by if you’re ever in the neighborhood!

Results of My Challenge:  The strawberries, both fences, and the pink throw are full-frame. The baby doll was cropped slightly to remove a distraction from one corner. I cropped the welcome sign image quite a bit, since I decided after the fact that I preferred a tighter view. There are a fence and shrub in the way that prevent me from framing this exact view without cropping.

This experiment took me back to my early, pre-zoom days of photography, when all I had was a fixed-focal-length “normal” lens for my SLR. I enjoyed “zooming with my feet” to frame these images as I wanted them, though I confess that I often found myself trying to zoom the lens just from habit.

There was one moment when I really wished for my telephoto zoom:

Visitor farSOOC (straight out of the camera)

But I got what I wanted anyway, thanks to the magic of cropping in Lightroom:

Morning visitorMorning Visitor

Many thanks to Brenda at How to Feather an Empty Nest for the Third Thursday Challenge that encourages me to prod  myself out of my comfort zone. And thanks to Ashley at Ramblings and Photos for the always entertaining Scavenger Hunt Sunday linkup.


12 Comments

Third Thursday Challenge: 03.2013

DSC_0457Growing Strong

The Third Thursday Challenge I took up this month may not seem particularly photography-related but, believe me, it is.

I’ve joined a gym.

Last Thursday, by coincidence (or fate) the third Thursday in March, our local fitness center offered a free yoga class. I’ve been interested in yoga for a while but had never tried it. A free class just a few minutes from home . . . how could I pass that up?

I went, I yoga’d, I got sore — and it felt good. After class I talked with the owner about the facilities and membership options. I asked if there was a senior discount, he said yes, and I signed on the dotted line. Since then I’ve had two sessions with a trainer to get me started. It feels wonderful to be challenging my body and to know I’m doing something good for my long-term health.

So what’s the photographic connection? We’ve all heard the expression, “Use it or lose it.” I’ve always been blessed with good health, stamina, and reasonable strength. But lately I’ve noticed a decline in that strength. I noticed that when I squatted down to get close to the ground to take a photograph, I had trouble standing again without putting my hand on the ground to help push myself back up to my feet. I also noticed that when I took a walk with my dSLR, my back would ache.

That’s not the person I want to be. I have too many things I want to do, too many ground-level wildflowers to shoot, to let myself get old and tired and weak. Well, getting old I can’t do much about . . . that will happen no matter what, and, as they say, it beats the alternative. But I can take charge of my fitness and build my strength back up. I can get up from the computer, get off the couch, turn off the television, put down the book, get moving.

So, truly, it was my photography that gave me the push I needed. After all, I have to be strong enough to take on another challenge next month!

Linking with Third Thursday Challenge for March.


16 Comments

Third Thursday Challenge: 02.2013

A few months ago, my friend Brenda, a wonderful photographer and author of the blog How to Feather an Empty Nest, started a linkup called Third Thursday Challenge. I’ve wanted to join in ever since I first heard of it. The goal is to expand our photographic vision, and the challenge is to try something new, something outside our comfort zone. This also fits well with my word for 2013, Explore, so this month I’m finally taking up the challenge.

In my recent post Breaking Through, I mentioned that I had discovered a way to overcome the soft images I’ve been getting from my dSLR. A couple of people asked in the comments if I would share what I had done. Although I didn’t do it with Third Thursday in mind, it was a new area of exploration for me so I think it qualifies!

Blurry Before -- Sharp After

Happy Discovery: Before and After
Click to enlarge the image and the difference will be easier to see.

After yet another disappointing photoshoot resulted in an entire series of soft images, I decided it was time to figure out what was wrong. I have a Nikon D5100. All the reviews I read before buying my camera highly praised its picture quality, but I haven’t been as impressed as I expected to be. So I went online and searched for variations of “unsharp photos with Nikon D5100.” Of course there are many reasons for unsharp images, but I was looking for something specific, not related to camera shake, poor quality lenses, too-slow shutter speed, etc. I found numerous discussion threads on various forums on this issue. I was not alone!

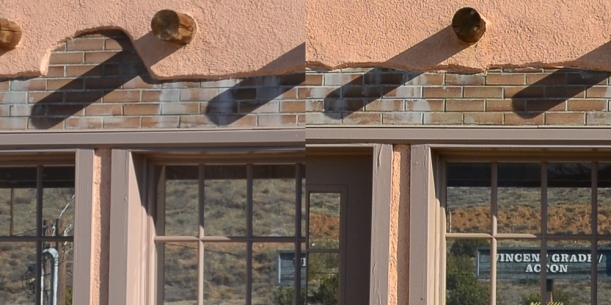
What I learned was that my camera’s shooting menu has a sub-menu called Picture Controls. My camera has six of them: Standard, Neutral, Vivid, Monochrome, Portrait, and Landscape. The default is Standard, a setting that’s meant to be acceptable for general, all-around shooting from landscapes to portraits and everything in between. That’s what the camera uses in Auto mode.

In Auto, the camera has a mind of its own.

Test Shot. In Auto, the camera has a mind of its own.

But — a-ha, the light begins to dawn — each of those Picture Controls has its own menu, where you can adjust contrast, brightness, saturation, hue, and SHARPNESS! In its infinite wisdom, Nikon’s default sharpness setting is, um, not very sharp. In Standard, on a scale of 1 to 9, the factory setting is 3. After some experimentation, I bumped it up to 6 and am much happier with the images I’m getting. I can still tweak sharpening a bit in post-processing if needed, but it takes much less work now to get the results I want.

Picture Controls don’t work if you’re shooting in Auto. In that case the camera uses Standard and decides for itself how much sharpening the subject needs. But in Program, Aperture or Shutter Priority, or Manual, you can select the Picture Control mode you want to use, and personalize it to suit yourself.

Vincent Grade StationBefore (Standard default) vs After (Vivid with Sharpness 6)

Vincent Grade Station
Before (Standard w/default Sharpness) vs After (Vivid w/Sharpness at 6)

I also shot a few images in each Picture Control mode to see what the difference was between them. I’m glad I did, because I discovered I prefer Neutral rather than Standard for the type of photographs I usually take. It yields a more natural color rendition that I like better — and, of course, I can still make adjustments in post-processing if I want to.

So that’s how I “fixed” my Nikon. I have no experience with Canon dSLRs, but I’d be surprised if they don’t have a similar feature somewhere in their menu. If you can’t find it on your own, just ask Google!

A note on these photos: All are straight out of the camera, except for close-up cropping to show detail. The side-by-sides were near-duplicate shots taken on two different days, the only difference being the in-camera Picture Controls adjustment.

So that’s my Something New for February. I’m already thinking about next month. Thank you, Brenda, for challenging me to challenge myself.

Come on over to Brenda’s and see what’s happening at the Third Thursday Challenge for February.